1. Create a service group. Lets call it EsbWebServiceClient
2. Create a xsd file to represent the configuration information that we will use to pass to the webservice.
3. Create a xml file that complies with the schema and the initial parameters for invoking the web service. The ESB adaptor will update this file after each invocation.
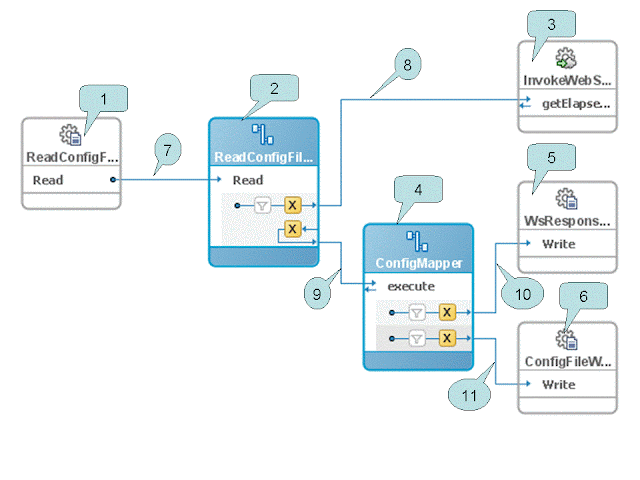
4. Create a file adaptor to read a file. Don’t check the mark that says delete file after reading. Specify the schema that you created in step 2 for the schema of the file. When you are done with step you should end up with boxes 1 & 2 shown in the diagram with the line connecting them.
5. Create a ESB Service for Soap service (Right click on design pane-> Create ESB Service->Soap Service) On the pop up window, select the WSDL file representing the service. For this demo, the web service is a simple service that takes a string as input and returns a string. This creates Box 3.with no lines connected.
6. Now create a schema that represents the input elements to the webservice and the output of the webservice. We will use this as the holding area to have both the request and response so we can write the output to a file and update the config file with the updated information. In the example the schema is called serviceParameterAndResponse.
7. Create a ESB routing Service and name it ConfigMapper.(Right click on design pane-> Create ESB Service->Routing Service) On the pop up window, select the serviceParameterAndResponse schema for both request and response formats.. This creates Box 4.with no lines connected. This routing service provides the framework for us to merge the input parameters and the webservice output.
8. Now create a file adaptor that can write an output file and name it WsResponseWriter. To keep it simple, specify the schema for the file as the same as the response from the webservice This should create Box 5 with no lines connected.
9. Now create a file adaptor that can write the config file and name that ConfigFileWriter.. Specify the schema and the location for the file as the same as the schema created in step 2. This should create Box 6 with no connector lines
10. Double click box 2 and add a routing rule to invoke the method on the webservice. This should create a reply line. Now point the reply to the execute method on the routing service created on step 7. This should create lines 8 & 9 on the esb diagram..
11. Double click box 4 and add two routing rules. One pointing to WsResponseWriter and the second one pointing to ConfigFileWriter. This should create the lines 10 & 11 in the diagram.
12. Now the diagram is almost complete. You will see the mappings are still gray. We will add the mappings which will make them yellow.
13. Double click on the top "X" and create a new mapping. When the designed is displayed, drag a line from the config parameter to the input parameter of the web service.
14. Double click of the bottom "X" of box 2. Create a new mapping. You will notice there is an option to "include the request in reply play load". Make sure you select this option. When the designer panel is displayed you should see a new node called “ESBREQUEST” on the left hand side. To learn more about the $ESBREQUEST parameter refer to this article (http://www.soastation.org/2007/05/esbrequest-in-oracle-esb-routing.html)
15. Now select the source view of the xslt and add a function to parse the required fields from the request to map to the output. In the example below, I have mapped the string after the pipe symbol to be stored as the parameter for the next call. And for the response, I have concatenated the input and the output to be written out to the file. Please note that you will not be able to drat lines to or from the $ESBREQUEST variable on the designer view.
<xsl:param name="ESBREQUEST"/>16. Now double click on the "X" on box 4 and create new mappings. These mappings should be straightforward as all the manipulation is done on the previous step. Just draw a straight line from the corresponding field on the left to right. Repeat this for both the ‘X” on the box.
<xsl:template match="/">
<out1:serviceParameterAndResponse>
<out1:param1>
<xsl:value-of select='substring-after(/tns:getElapsedTimeSinceResponse/tns:return,"|")'/>
</out1:param1>
<out1:response>
<xsl:value-of select='concat(substring-after(/tns:getElapsedTimeSinceResponse/tns:return,"|"),substring($ESBREQUEST/tns:lastTime,1.0,2.0))'/>
</out1:response>
</out1:serviceParameterAndResponse>
</xsl:template>
17. Now your diagram should look similar to the one shown above. You can register the service to your ESB and test it.
If you like see a copy of the project that I used to create the demo, feel free to drop me an email. My email address is jmeslie at gmail dot com.

1 comment:
Really helpful and clearly laid out—this step-by-step makes Oracle ESB feel way less intimidating I was actually taking a short break from checking the NTS test schedule and stumbled on this, glad I did. Practical walkthroughs like this are gold for anyone working with ESB integrations.
Post a Comment